Thursday, November 8, 2012
Finally....The Lace Mat
Even though in the beginning I was on a roll with the Lace Mat started by Jon Yusoff, life came into my way. I also traveled to India to see my mom. Of course during my waits at the airport, I was tatting and that peeked quite a lot of interests. The good part is that, many of them knew or had heard of tatting before. Here is my final product. Rows 1 and 4 are the same variegated thread. On rows 2 and 3, I used the matching greens which I also used alternatively in the final clovers.


Thursday, September 27, 2012
Two Posts in a day?
This is totally not me.....but, I am so excited and have to do a second post today. I took a side bar from tatting and did some beadwork and want to share it with you. How do you like it?? There is one mistake - the bracelet ended up to be little too big for my wrist. Therefore, I have to give it as a gift. Ummmm...who is going to be the lucky recipient?


Lace Mat - On A Roll
Even though the third row was not my favorite, I was eager to complete it. I finished it last night and blocked it also. However, the ends have to be sewn in. So, what color should I use next. I think I am leaning to the color of the first row. On the other hand, I could order the Raspbery Lizbeth. I may lose interest in this mat if I wait too long. :) I have enough to-do's. How does a tatter have so many WIP??


Tuesday, September 25, 2012
Tat-Along .... onto row 3
I have now completed row 2 of the tat-along. I have to say that Jon definitely did a wonderful job in the charting. It was very easy to follow. I started on row 3 but can see that the long chains are already getting in my way. It is certainly an easy row to tat but long chains are not my favorite.


Friday, September 21, 2012
Tat-Along Lace Mat
I have also joined Jon Yusoff's call to the Tat-Along Lace Mat - original pattern by Norma Benporath. Jon has been very resourceful in creating visual with counts. Since I am going to tat with different colors in each round, I am not going to worry about continuous tatting using Split Rings and Split Chains.
I found these beading needles called "Big Eye" beading needle. The middle part of the needle is like a thread looper and therefore, any size thread will go through it. Being a flexible piece of wire, when you sew in the ends, the needle bends, but it still does the job well.
I completed row 1 and it definitely needed bursts of steam to make it lay flat. I did not spend a lot of time pinning it to bring it to the shape as it was late yesterday when I finished it and I was tired.


Wednesday, September 5, 2012
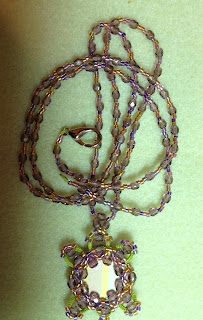
Tatted Sassy Turtle
I have been taking online tatting lessons from Teri Dusenbury . Her work is simply stunning. I was amazed at her talent; drooling whenever I saw her tatted and beaded creations. Teri used to have a blog where she shared numerous free tatting patterns (her own designs as well as vintage ones). For a long time, I did not know what happened to her until recently when I "bumped" into her on Facebook. I showed interest in learning from her and she asked me whether I wanted to be an online student (again "free of charge").
Teri has been extremely patient with me. Now I am so confident in being able to manipulate 130 - 150 inches of thread/cord and doing finger tatting. Yes, you heard that right - finger tatting with beads. Here is my first completed project in its entirety - SASSY TURTLE. I have started naming my turtles now.

Sunday, July 29, 2012
Hooray......I got it!!
If you have been following the posts of Jon Yusoff and Frivole, you saw that they are mastering the Interlocking Rings. It all came about as Rachel has a new motif pattern that she posted on her blog.
In any case, I have been trying to do the interlocking rings watching Karen Cabrera's videos. But, it just did not click. My problem was not as much getting the last ring correct but more into that there will be at least one ring in between that quite did not look as interlocking rings.....as per Jon's words, "they are not in the same direction". I think we Math folks have an issue when things are not in order.
Anyway, I have to say that persistence and some help from Jon's diagram has got me successful in this venture. This picture may not be the greatest. It looked great on my iPhone. But, when I sent it as an email attachment as small size, it looks all blurry. But, you can see my successful attempt!


Subscribe to:
Posts (Atom)